环境:Unbuntu20.4LTS
交叉编译工具链:arm-linux-gnueabihf-gcc
软件:VsCode
编译环境搭建及测试
下载交叉编译器
工具地址:https://releases.linaro.org/components/toolchain/binaries/
比如gcc-linaro-7.5.0-2019.12-x86_64_arm-linux-gnueabihf.tar.xz
完整路径:
https://releases.linaro.org/components/toolchain/binaries/7.5-2019.12/arm-linux-gnueabihf/gcc-linaro-7.5.0-2019.12-x86_64_arm-linux-gnueabihf.tar.xz
安装
先解压
1
2
| xz -d gcc-linaro-7.5.0-2019.12-x86_64_arm-linux-gnueabihf.tar.xz
tar -vxf gcc-linaro-7.5.0-2019.12-x86_64_arm-linux-gnueabihf.tar
|
将当前的bin目录添加到环境变量中,使用命令pwd
1
2
| root@xiaobai-virtual-machine:/home/xiaobai/Work/gcc-linaro-7.5.0-2019.12-x86_64_arm-linux-gnueabihf/bin# pwd
/home/xiaobai/Work/gcc-linaro-7.5.0-2019.12-x86_64_arm-linux-gnueabihf/bin
|
1
| export PATH=/home/xiaobai/Work/gcc-linaro-7.5.0-2019.12-x86_64_arm-linux-gnueabihf/bin:$PATH
|
环境变量生效
查看设置的路径,命令echo $PATH
顺便输入arm然后按按tab键看看有没有补齐
使用
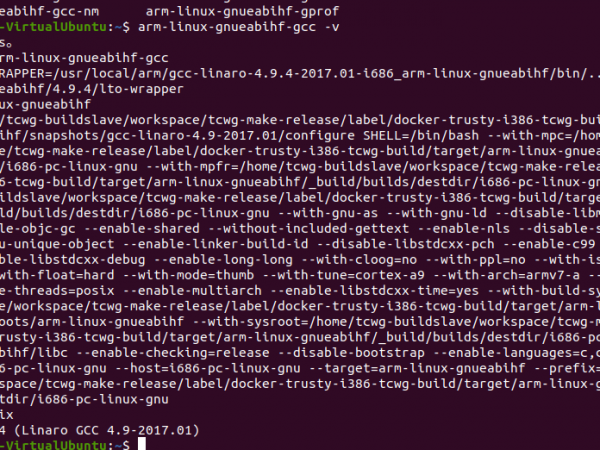
输入命令arm-linux-gnueabihf-gcc -v,查看是否出现版本信息
1
2
3
4
5
6
7
| Using built-in specs.
COLLECT_GCC=arm-linux-gnueabihf-gcc
COLLECT_LTO_WRAPPER=/home/xiaobai/Work/gcc-linaro-7.5.0-2019.12-x86_64_arm-linux-gnueabihf/bin/../libexec/gcc/arm-linux-gnueabihf/7.5.0/lto-wrapper
Target: arm-linux-gnueabihf
Configured with: '/home/tcwg-buildslave/workspace/tcwg-make-release_1/snapshots/gcc.git~linaro-7.5-2019.12/configure' SHELL=/bin/bash --with-mpc=/home/tcwg-buildslave/workspace/tcwg-make-release_1/_build/builds/destdir/x86_64-unknown-linux-gnu --with-mpfr=/home/tcwg-buildslave/workspace/tcwg-make-release_1/_build/builds/destdir/x86_64-unknown-linux-gnu --with-gmp=/home/tcwg-buildslave/workspace/tcwg-make-release_1/_build/builds/destdir/x86_64-unknown-linux-gnu --with-gnu-as --with-gnu-ld --disable-libmudflap --enable-lto --enable-shared --without-included-gettext --enable-nls --with-system-zlib --disable-sjlj-exceptions --enable-gnu-unique-object --enable-linker-build-id --disable-libstdcxx-pch --enable-c99 --enable-clocale=gnu --enable-libstdcxx-debug --enable-long-long --with-cloog=no --with-ppl=no --with-isl=no --disable-multilib --with-float=hard --with-fpu=vfpv3-d16 --with-mode=thumb --with-tune=cortex-a9 --with-arch=armv7-a --enable-threads=posix --enable-multiarch --enable-libstdcxx-time=yes --enable-gnu-indirect-function --with-build-sysroot=/home/tcwg-buildslave/workspace/tcwg-make-release_1/_build/sysroots/arm-linux-gnueabihf --with-sysroot=/home/tcwg-buildslave/workspace/tcwg-make-release_1/_build/builds/destdir/x86_64-unknown-linux-gnu/arm-linux-gnueabihf/libc --enable-checking=release --disable-bootstrap --enable-languages=c,c++,fortran,lto --build=x86_64-unknown-linux-gnu --host=x86_64-unknown-linux-gnu --target=arm-linux-gnueabihf --prefix=/home/tcwg-buildslave/workspace/tcwg-make-release_1/_build/builds/destdir/x86_64-unknown-linux-gnu
Thread model: posix
gcc version 7.5.0 (Linaro GCC 7.5-2019.12)
|
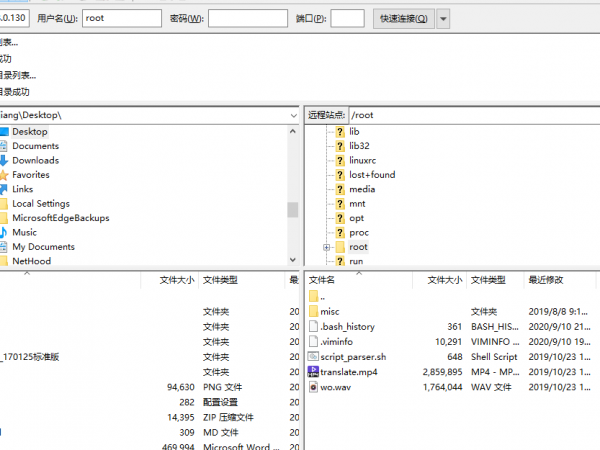
在a40i开发板上配置sftp用于文件传输,将编译完成的可执行文件传到a40i开发板上运行
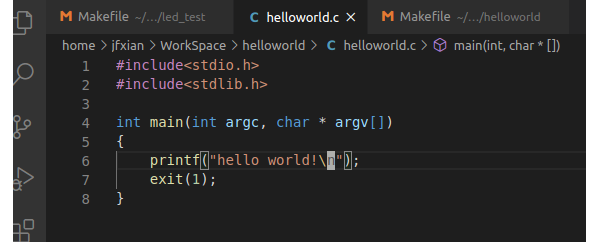
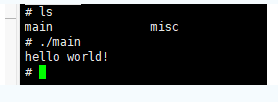
在Unbuntu20下编写一个helloworld.c文件
通过其他教程学习了一下Makefile文件的构成及简单实现,make编译得到可执行文件main


将main文件通过sftp复制到a40i开发板root目录下,修改运行权限并运行测试
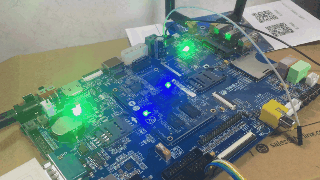
利用上述方式控制LED闪烁
linux系统下一切皆文件
编写gpio_test.c文件,这里参考了文章https://www.jianshu.com/p/e5ecd92c0787
1
2
3
4
5
6
7
8
9
10
11
12
13
14
15
16
17
18
19
20
21
22
23
24
25
26
27
28
29
30
31
32
33
34
35
36
37
38
| #include <stdio.h>
#include <stdlib.h>
#include <unistd.h>
#include <sys/stat.h>
#include <sys/types.h>
#include <fcntl.h>
char *GPIO_PATH = "/sys/class/gpio/gpio43/value";
int main(int argc, char *argv[])
{
int res = 0;
int fd;
char *path;
printf("Gpio test demo\n");
if(argc >= 2)
{
path = argv[1];
}
else
{
path = GPIO_PATH;
}
fd = open(path, O_WRONLY);
if(fd<0)
{
printf("Failed to Open gpio %s/n", path);
exit(1);
}
while(1)
{
write(fd, "1", 1);
sleep(1);
write(fd, "0", 1);
sleep(1);
}
close(fd);
}
|
编写Makefile文件进行编译
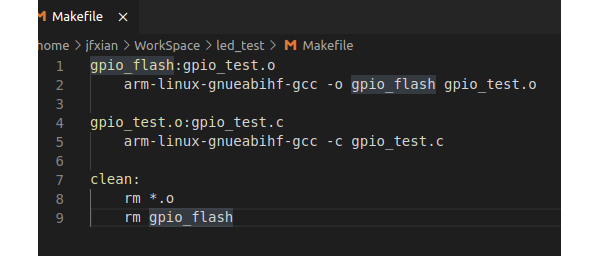
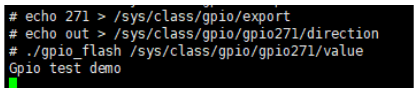
将生成的可执行文件gpio_flash复制到a40i开发板目录中,不加任何参数运行可以看到a40i核心板上的LED闪烁
带参数可以换一个gpio进行控制